Welcome back to my Cosplay4Everyday feature, which I’ve been having so much fun with that I’ve kind of neglected my other blog duties– I have ignored the iTunes Single of the Week for about a month now, there isn’t much going on red carpet-wise during the summer, I haven’t been to the movies lately, and I’m not currently involved with any television shows. I have been reading, though, and what I’m reading right now is A Dance With Dragons, the fifth installment in George R.R. Martin’s “A Song of Ice and Fire” series. The fourth book, A Feast For Crows, took me forever to get through because it didn’t feature a lot of my favorite characters at all– no Tyrion, very little Jon Snow, and worst of all, no Daenerys. I’ve been in a Game of Thrones mindset since the fourth season began airing, and now that it’s over I feel a little bereft; the internet having basically blown up the other day when erstwhile Eddard Stark actor Sean Bean all but revealed that the popular fan theory known as “R+L=J” is spot-on, it seems a lot of other people are, too. I don’t know what implications this being true would have for my beloved khaleesi, but in any case, Jon’s still a bastard (sorry, Jon, I still love you), and the Iron Throne is still in my humble opinion the future seat of Dany. She’s the Mother of Dragons and completely badass in her own right, besides having the best claim to the throne by birthright.
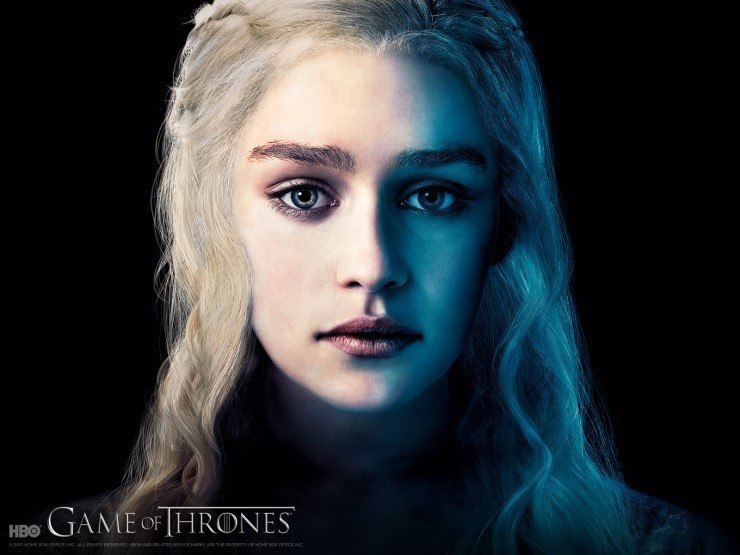
Anyway, Dany rocks some enviable hairstyles throughout the show, but almost all are variations on a basic double crown braid. The hair is totally a wig on the show, as actress Emilia Clarke is really a brunette, so in that spirit, as well as the spirit of Cosplay4Everyday being all about clandestine cosplay in real life, I’m not going all out– working with my real hair, which is also brunette. Let’s start with the makeup, since Dany’s is so simple.
Stuff You’ll Need:
- Your favorite foundation– as you know by now, mine is Hard Candy’s Just Face It in Ultra Light. Don’t bother with powder, unless you really need it, since Dany’s look is very natural and dewy.
- Blush in a pinky tone, not too peachy, but not pure pink either. I always use a lipstick because I like the texture and I’m frugal; the Estee Lauder Heathermist Pink I used in the Mary Queen of Scots cosplay will work great here.
- Eyeshadow in a duo of matte browns, one dark and one very pale, plus an extra shimmer in white if you want to play up the shine. My favorite matte browns are from Lancome; I’ve had them forever (they were part of the free gift from some perfume I bought a million years ago), a Maquiriche duo in Sable and Cappuccino. For the shimmer, I always go with the white shade from my New York Color trio called Spotlight, but be warned that a little of it goes a long way.
- Brown eyeliner– I’m working with a pencil this time around, Maybelline’s Expert Eyes in Light Brown. If you want to go a tad smokier, you can use a wet brown eyeshadow– the dark brown shade from my Hard Candy Under the Moon Mod Quad would be excellent for this, though it’s shimmer, so go light.
- Your usual black mascara, in my case New York Color’s Instant Lash.
- Lipstick in a light brown tone. I’m using Estee Lauder’s Cafe Latte, which looks dark in the tube but goes on much lighter than it looks.
- Brown eyebrow pencil or powder– the eyeliner or the darker matte eyeshadow can pull double duty here.
Okay, got everything? Let’s make up.
- Start with your foundation– don’t forget your eyelids. Gotta prime.
- Give yourself a smile in the mirror and apply your blush to the apples of your cheeks– where you would get sunburned first. Dany spends a lot of time in the sun, traveling between the cities she’s conquering like a boss. Well, at least till she got to Meereen, where she’s doing a bit more of the royalty thing. Blend well for the most natural look.
- Eye time! Start with your liner, whether it’s a pencil or a wet shadow. Trace your upper lash line, right up against it. Don’t overdo it– just a little definition. Then smudge a bit on your lower lash line, just as you normally would, and blend. Next apply your lighter matte brown shadow in a medium-thick line across your eyelid, followed by your darker brown in the crease. Blend. Go back to your light brown and sweep over the brow bone, blend once more, and if you want some shimmer, add your white over this, up to the brow line. Blend again, then add your mascara; just one coat is necessary.
- Pencil or powder in your brows– Dany’s eyebrows are quite bold, so go as free as you feel comfortable with.
- Put on your lipstick, and you’re all done.
Hair is the hard part. Let’s do this.
Stuff You’ll Need:
- 6 hair ties
- Brush
- Tail comb
- Hairspray
If you’ve noticed, I’m not big on pins. If a hair tie can’t accomplish the look I’m going for, I scrap it. Usually. Unless I just have to have the hairdo, but even then, the fewer the better. Anyway, let’s do some hair.
- Get as close to a center part as you can, then separate a small chunk of hair right around the temple– leave a strand in front of each ear. We’re going to braid back both sides. Take your strand and do the first three turns as if you were starting a normal French braid. Now comes the tricky part. The braids aren’t normal French braids. They’re Dutch braids, which means they’re inverted. When you grab a new piece of hair to add to the braid as you go back, you need to cross it under the main braid instead of over. Keep up this process till you reach the back of your head, using a tail comb to keep things smooth if need be, then braid away from your head normally for a couple of turns and tie off. Repeat on the other side.
- Connect these two braids at the back of the head, tie off, and remove the extra ties if you want, though the going might be tricky.
- We’re going to cheat a bit on the second tier of braids, because OMG I forgot how much I hate Dutch braiding. Also, if your hair is super fine and flyaway like mine, you might not have enough hair left over to make a second set of Dutch. Take a section of hair from above the ear, leaving a tendril in front of the ear as I said before, and just braid it normally, away from your head. Tie off and repeat on the other side. If these braids look too skinny compared to the Dutch braids, go for it and Dutch ’em, or continue to cheat as I did and just fluff them out so they’re looser.
- Connect these two braids at the back of the head– below the first set, but over top of the ends of the first set.
- Connect ALL the braids at the back above your loose bottom layer. If you want to take out the extra ties, you might have to give them a snip.
- Secure with hairspray– if you need a little extra volume, flip your hair upside down and spray underneath, even teasing a bit if necessary.
- The little strands you left in front of your ears? You can either curl them or leave them wispy– I’ve seen khaleesi do it both ways. I left mine be, because they were very fine– my hair is a cross between baby hair and a haystack.
Tah Dah! You are the Mother of Dragons.

Apologies for the lighting, as this is the first of these I’ve finished at night (the Dutch braids were giving me fits). Here’s a look at the back (thank you, Fluffy Stepson, for assisting me):

Daenerys wears a lot of blue, and a lot of natural fabrics. I played with this by wearing a giraffe-print camisole topped with a blue paisley sheer blouse. Halter tops would look good, or anything animal print or blue. I’ve rarely seen her wear jewelry, so you don’t really need it, but if you do, go for something bold like arm cuffs, big hoops, or statement necklaces– think Bronze Age.
Hope this is helpful if you’re looking to cop this style. This isn’t one of my better cosplays due to the texture of my hair, but if yours is thicker you’ll probably have less of a headache than I did. Thanks for reading, and see you next time out.


